From flip chart to whiteboard: Transforming classroom content into live online training

We’re one year into the COVID-19 pandemic. You likely haven’t participated in face-to-face (F2F) training in a long time. By now let’s hope all of us are experiencing (or creating) online training experiences that are more than poor substitutes for F2F training. When done well, live online training – also known as “virtual instructor-led training” (VILT) – can be as good as, if not better than, classroom training.
Good instructional design matters even more to VILT than it does to classroom training. A seasoned, charismatic trainer can cover up all kinds of sins in the classroom. A classroom trainer also doesn’t compete with the distractions facing the at-home learner. Good VILT design takes advantage of online tools that allow the trainer to get out of the learner’s way. Live online training should not be an online lecture.
In this article, I’ll talk about three tools found in most online training platforms (including Zoom, Webex, and Adobe) that can be used to create engaging and effective training. For instructional designers, I hope this sparks some ideas on how to use the tools. For those who purchase training services, I want to give you an idea of what to look for in good VILT design.
Tool 1: Chat
In face-to-face training, a trainer can ask, “What makes someone a good leader?” The response to this could range from crickets to a flurry of hands in the air or shouted responses. F2F training is ideal for discussion; you might think anything virtual would pale in comparison. It doesn’t have to be that way. VILT allows you to participate in discussion in multiple ways, which encourages more learners to contribute.
Most online platforms have the virtual equivalent of raising a hand. When called on, you unmute yourself to speak. Like the physical classroom, there are typically a few participants who will happily talk. The chat tool is a friend to the introverted and those not in a position to verbally communicate. Type your ideas and examples into the chat box and voilà – you’ve contributed to the discussion.
There are drawbacks to chat. If a lot of people are typing, your ideas can quickly disappear from what’s visible on the screen. It also might not be as memorable as something said out loud. However, the flexibility of chat more than makes up for its drawbacks. Instructional designers use it in many ways. For example, You can pair people up in chat and ask them to introduce themselves or exchange ideas (“pair and share”). That cuts down on the noise of 30 people carrying on in the same chat box. You can also use chat to share links or conduct a poll. Here’s an example of a poll question that’s a good starting point for a discussion.
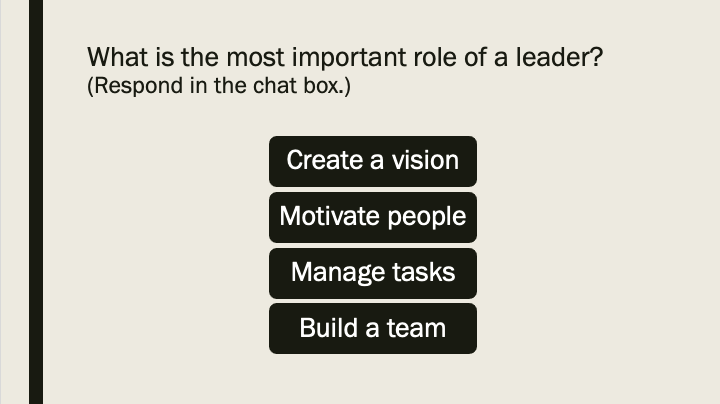
Learners respond to the poll in chat.
Another benefit of chat is that it’s easy to use (for learners) and manage (for trainers). Most learners are familiar with typing in a chat box. It doesn’t require them to grab an annotation tool for a whiteboard. It also doesn’t require the behind-the-scenes logistics of virtual breakout rooms. However, both whiteboards and breakout groups have their place, which we’ll see next.
Tool 2: Whiteboard
I love designing activities for a virtual whiteboard. It’s a wonderfully creative outlet for engaging learners. The closest classroom equivalent is the flip chart. In the classroom, flip charts are typically used in small breakout groups. Have you ever been in a classroom breakout group tasked with brainstorming? Chances are one person was the “note taker” and used a marker to write the group’s ideas on a flip chart. Someone then presented the flip chart to the rest of the class. Flip charts are also used for “gallery walks”, whereby learners circulate around the room, reviewing flip charts and adding ideas.
Flip charts have their place in F2F training. Yet they cannot rival the virtual whiteboard’s ability to spark creativity, share ideas, and encourage collaboration. You can type, draw, stamp, highlight, and otherwise annotate on a whiteboard. Would you ever ask 15 people to write on the same flip chart? Not if you want to read it. But 15 people collaborating on one virtual whiteboard is possible and even fun.
The best way to show the whiteboard’s potential is through examples.
Windowpane
The Bob Pike Group calls the example below a “windowpane”. Learners grab a cell within the windowpane and use it to draw or write something.

Use a “windowpane” for learner introductions.
In this example, learners type one word or draw one image that says something about them. The trainer might ask learners to elaborate on their word or image. A variation of this icebreaker is to start with a completed windowpane. Cells contain facts, such as “has 2 brothers” or “has lived in Europe.” Learners place a stamp next to the facts that apply to them. They then see at a glance what they have in common with other participants.
Windowpanes have applications in VILT beyond introductions. For instance, the trainer can ask learners to draw something that connects to a concept covered during training – or ask them to complete the grid with answers to a question (“What qualities are important in a leader?”).
The windowpane illustrates one of the limitations of a whiteboard. There are 16 cells in the windowpane above. If your training has 20 people, four people are out of luck. More than 20 people is not ideal for highly interactive online training. Whiteboards (not to mention the chat box) start to get too crowded, though there are ways around it. For example, the trainer can say: “All those with birthdays between January and June, respond to Question 1. Those with July to December birthdays, respond to Question 2.”
T-chart
Here’s another example of how to keep the focus on learners during online training. A T-chart divides the space into two columns. Columns might be labelled “pros” and “cons”, “best” and “worst”, “uses” and “constraints”, and so on. Learners then claim their space and type their responses. In the example below, learners list the advantages and disadvantages of an autocratic leadership style.

In this T-chart, learners list advantages and disadvantages.
Suddenly, what could have been a lecture (“Here are the advantages of…”) is transformed into a collaborative activity. Again, if there are a lot of participants, the trainer can organize who writes where. For instance, those with names starting with A–L, give pros; those with names starting with M–Z, give cons.
Tool 3: Breakout Rooms
If you’ve participated in F2F training, you’re probably familiar with the breakout group concept. The trainer divides the class into smaller groups to work on an activity. Perhaps you read and discuss a case study or brainstorm a solution to a problem. Maybe your group creates a flip chart for display on a gallery walk. Most of the activities traditionally done in classroom breakout groups can be migrated to virtual breakout groups. Participants are sorted into breakout rooms, where they can use all the tools available to the full group (whiteboards, chat, video, etc.). The trainer can “drop in” on each group to check progress and answer questions.
Logistically, virtual breakout groups are more complicated than F2F groups. The trainer and producer must be adept at using the software and explaining the process to learners. It can take time to break the ice in a virtual breakout group, especially if you can’t see people’s faces or body language. Invariably, there will be people with technology issues, which limits their participation. For these reasons, breakout activities should be used sparingly. I wouldn’t design more than two for a three-hour training session. Reserve your breakouts for substantive activities that require at least 20 minutes of collaboration. Good instructional design – which includes good facilitator and producer notes – is critical to seamless breakout groups.
Here’s an example of an activity you could do in virtual breakout groups. You want the group to come to a conclusion on the qualities of a good leader. A trainer might divide participants into four breakout groups. Each group is assigned either “good leader” or “bad leader” and must list the characteristics of good or bad leaders. In separate “rooms” they use a virtual whiteboard and later report back to the full group.
I’ve included only a few sample slides below. In reality, you’d need slides with instructions on the process and how to use the technology, as well as slides set up as whiteboards for each group. Again, set-up can be cumbersome for virtual breakout rooms. Use them wisely!


A barking dog. Kids whining. The latest social media posts. Your online training is competing with a lot of distractions in the home environment. Don’t contribute to Zoom fatigue! Consider how you can use chat, whiteboards, and virtual breakout rooms to deliver an engaging and effective learning experience.
If you would like to learn about my online training design services, contact me.